Home appliances are crucial to the smooth operation of daily life, from keeping your food fresh to making laundry a breeze. But like any other machine, they require regular maintenance to perform at their best and avoid unexpected breakdowns. Knowing how often to service your appliances can help extend their lifespan, improve efficiency, and even save you money on energy bills and costly repairs. In this blog post, we’ll discuss the recommended service intervals for key home appliances, including refrigerators, washing machines, dryers, ovens, and dishwashers, and offer tips on what to look out for during these service checks.
1. Refrigerator: Service Every 6-12 Months
The refrigerator is one of the most important appliances in your home, and because it runs continuously, it’s also one of the most likely to wear down over time. Regular maintenance is essential to keep it running smoothly.
– Frequency: It’s recommended to service your refrigerator every 6-12 months. During these checks, clean the condenser coils to ensure they remain free of dust and debris, which can make the refrigerator less efficient and cause it to work harder.
– What to Check: Inspect the door seals for signs of wear and tear, as a loose or damaged seal can let cold air escape, making the fridge work harder and increasing energy costs. Also, check the drip pan and defrost drain for clogs, which can cause water leaks inside the refrigerator.
– Professional Checkup: Every few years, it’s a good idea to have a technician check the refrigerant levels, test the thermostat, and ensure the compressor is functioning properly. These deeper checks can prevent major issues down the road.
2. Washing Machine: Service Every 12 Months
Washing machines take on heavy loads week after week, making regular maintenance critical to their long-term performance.
– Frequency: It’s advisable to service your washing machine once a year. This includes inspecting the hoses, cleaning the drum, and checking the drain filter for clogs.
– What to Check: Look for any signs of wear or damage on the hoses, as these are prone to leaks. Replace hoses every 3-5 years to prevent unexpected water damage. Cleaning the drum and running an empty cycle with a washing machine cleaner or vinegar every month helps prevent mold, mildew, and detergent buildup.
– Professional Checkup: A technician can assess the motor, drive belt, and other internal components to ensure everything is in good working order. This can prevent sudden breakdowns and ensure the washing machine operates efficiently.
3. Dryer: Service Every 12 Months
A well-maintained dryer can save energy and reduce the risk of fire hazards caused by lint buildup. Keeping it in good shape can also extend its lifespan.
– Frequency: Like the washing machine, your dryer should be serviced annually. Regularly cleaning the lint filter after every use is essential, but a more thorough service is necessary to ensure proper function.
– What to Check: Inspect the vent hose and ductwork for lint buildup, as clogged vents can lead to longer drying times and even pose a fire risk. Clean the vent hose and ductwork at least once a year, and ensure the exterior vent cap is free from obstructions.
– Professional Checkup: A technician can inspect the heating element, drive belt, and drum rollers. This can help prevent issues like overheating or a broken belt, which could render your dryer inoperable.
4. Oven: Service Every 12-18 Months
Your oven plays a key role in meal preparation, and regular servicing can help ensure even cooking and maintain safety.
– Frequency: Ovens should be serviced every 12-18 months, especially if you use them frequently. Keeping your oven clean inside and out can help maintain efficiency and prevent the buildup of food debris that can cause smoke or even fires.
– What to Check: Inspect the door seal to make sure it’s intact, as a damaged seal can cause heat to escape and affect cooking times. Clean the burners on gas ovens and the heating elements on electric ovens to ensure they’re working properly. If your oven has a self-cleaning function, use it sparingly to avoid putting excessive strain on the heating elements.
– Professional Checkup: Have a technician check the thermostat, gas connections (for gas ovens), and any electronic controls. This can help ensure that your oven heats up evenly and safely, without the risk of gas leaks or electrical issues.
5. Dishwasher: Service Every 6-12 Months
A dishwasher can save you time and water compared to handwashing, but it needs regular attention to stay in good working condition.
– Frequency: Service your dishwasher every 6-12 months. Regularly clean the filter to remove trapped food particles that can lead to clogs and odors. Also, run a cleaning cycle with a dishwasher cleaner or vinegar once a month to remove soap scum and mineral buildup.
– What to Check: Inspect the spray arms for clogs, and ensure they spin freely. Check the door gasket for any cracks or tears that could cause leaks. Make sure the drain hose is free of obstructions, which can prevent water from draining properly.
– Professional Checkup: A technician can test the motor, pump, and heating element to ensure they are working efficiently. This can help prevent issues like incomplete draining or poor drying performance.
General Maintenance Tips for All Appliances
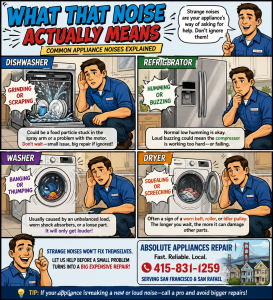
– Keep an Eye on Unusual Noises: Any strange noises, such as grinding, squealing, or banging, could indicate that an appliance part is failing. Addressing these issues early can prevent more extensive damage.
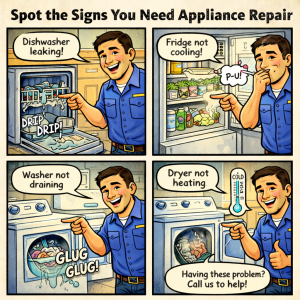
– Check for Leaks: Water leaks around appliances like washing machines, dishwashers, and refrigerators are a sign that something is wrong. Investigate leaks immediately to prevent water damage to your home and further issues with the appliance.
– Monitor Energy Bills: A sudden spike in your energy bill can be a sign that an appliance is working inefficiently. This could mean it’s time for a thorough cleaning or a professional checkup.
– Follow the Manufacturer’s Recommendations: Always refer to the user manual for your appliance’s specific maintenance guidelines. Manufacturers provide detailed instructions on how to care for your appliance to maximize its lifespan.
Conclusion
Knowing how often to service your home appliances can save you time, money, and frustration in the long run. Regular maintenance ensures that your appliances run efficiently, reducing the risk of breakdowns and extending their lifespan. While you can perform some of these maintenance tasks yourself, it’s always a good idea to have a professional appliance technician conduct more thorough inspections every year or two.
By following these service guidelines, you’ll keep your refrigerator, washing machine, dryer, oven, and dishwasher in peak condition, helping you avoid costly repairs and prolonging the life of your appliances. If you’re unsure about any maintenance task or encounter a persistent problem, don’t hesitate to reach out to a qualified technician for expert assistance. A little care and attention can go a long way in keeping your home running smoothly.